We’d all like to think that every single person that comes in contact with our business follows a very straight and orderly path to purchase. Someone visits our site for the first time, then fills out a form to download an ebook, then becomes interested in talking with a sales rep, all in one session on your website.Minutes later, the sales rep reaching out to this lead, and before you know it, the lead is becoming a customer, handing over their credit card to purchase something from your company.
But in reality, the buyer’s journey is probably not so linear. People pop over to your website then leave. Two months later, they discover your latest blog article, and then decide to download that ebook. A few days after that, they decide to check out another blog post. Maybe a week later they decide to get in touch with Sales, and it takes several more weeks of meetings and discussions to come to a decision to buy. Same end result, but the process is a little more convoluted.
So marketers need to be prepared to help their buyers through that convoluted process. One great way to do that is with retargeting ads. Unlike typical banner ads, retargeting ads are served to people who have already visited your website or are a contact in your database (like a lead or customer).
If you’ve never used retargeting before, don’t worry — in the following post, we’ll go through all the basics of how retargeting works, explain how you can use it to support your larger marketing goals, and even outline an example of a Facebook Ad retargeting campaign. Let’s dive right in.
How Retargeting Works
There are two main types of retargeting: pixel-based and list-based. The way each works is slightly different, and each has different advantages based on your campaign goals.
Pixel-based retargeting is a way to re-display your material to any anonymous site visitor.
This is probably the most common type of retargeting. When someone comes to your website, an unobtrusive piece of JavaScript (often referred to as a pixel) is placed on their browser — making their browser “cookied.” When they leave your site to surf the web, that cookie notifies retargeting platforms to serve specific ads based on the specific pages they visited on your website.
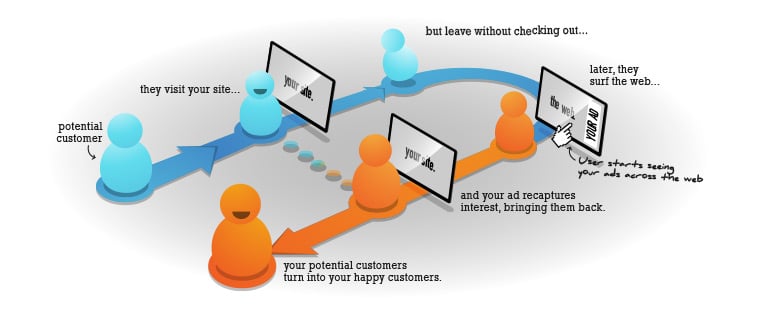
The advantage of pixel-based retargeting is that it is timely (they can be retargeted pretty immediately after leaving your site), specific to a particular page on your site, and behavior-based. Downsides to this method are that there is a lower volume of people in the campaign at any given moment in time since it’s all based on how often people are coming to your website, viewing certain pages, and leaving. It also can be complicated or time-intensive to implement the JavaScript on many website pages.
List-based retargeting works after you already have someone’s contact information in your database.
You can also use lists of your existing contacts for certain types of retargeting ads. The way that works is you upload a list of the email addresses to a retargeting campaign (usually on a social network like Facebook or Twitter), and the platform will identify users on that network who have those addresses and serve retargeting ads just to them.
Though it’s a little less common than pixel-based retargeting, list-based retargeting allows you to have highly customizable criteria for your ads because it’s based on more than behavior — you’re choosing who goes in which list. On the flip side, it’s possible that a person in your list gave you one email address and the social network another — and in that case, they won’t see your ads. This happens quite frequently: according to MediaMath, match rates can vary from 70-80% down to as low as 20-30% for some platforms, so you’ll need a fairly large list to make this type of retargeting effective. And because you are in charge of uploading and maintaining the list, list-based retargeting also is less automatic and timely than pixel-based retargeting.
Which Goals You Should Have for Retargeting
Now that we have the background for how retargeting works and the different types of audiences you can segment by, we can focus on the goals you should aim for. The main types of retargeting campaigns you should consider running are those for awareness and those for conversion.
Awareness
Awareness campaigns are useful when you want to re-engage website visitors and tell them about relevant products, features, or announcements. These ads are usually served to pixel-based lists.
The obvious drawback to awareness campaigns is that you’re serving less targeted content to people who haven’t engaged heavily with your brand. They’re not in your contacts database, and often, there are lower expected clickthrough rates than other types of campaigns.
However, since the goal is to make prospects aware of your business, impressions and engagement are acceptable metrics to track. Often awareness campaigns are precursors to a much more effective campaign goal: conversions.
Conversion
Conversion goals are just that — you want to get people to click on your ad and take a next step, such as filling out a landing page form. Conversion campaigns are best used to align a specific list with a clear next step in the funnel, and can be measured with typical conversion metrics like website clicks, form submission, and cost per lead (CPL).
The best thing about a conversion campaign is that you can use it for multiple parts of the funnel. You can use pixel-based ads to generate leads — the ads will direct people to landing pages where they can give over their information. You can also use list-based ads to better qualify those leads — the ads will appear to contacts who gave you limited information and lead them to longer forms with additional fields. You can also use retargeting to move those qualified leads closer and closer to the bottom of the funnel. For example, you might use retargeting to send a list of contacts that have downloaded an ebook to sign up for a free trial of your product.
Regardless of your goal, it is important to align the positioning, creative, and next step in the conversion process — whether that’s an offer landing page, site page, or request for more information — with the list you’re showing it to. Remember, list-based retargeting can have low match rates (users synced with accounts on each platform, usually by email address), so you’ll need to make sure you’re fueling your retargeting activities with lots of top-of-the-funnel inbound activities.
Choosing a Retargeting Platform and Tool
Truthfully, you’ve got quite a few options for actually implementing your retargeting. There are tons of third-party platforms to do web and social retargeting, such as PerfectAudience,AdRoll, Retargeter, Bizo, and many more. You can also do retargeting through specific platforms like Facebook, Twitter, and LinkedIn.
While each platform you use to implement your ads will be different, there are some advantages and disadvantages for choosing ones that serve up social media ads or elsewhere on the web. Social media retargeting often works well since people are more likely to share, reply, and discuss your content on one of these well-known platforms. They are also can see the ads are posted from a real account, as opposed to a small web banner ad with little text that could be posted by anyone. That being said, web retargeting works well for impressions since the ads follow your targeted audience throughout the internet, not just on a few specific social media sites.
Want to see how setting up a remarketing campaign is like? We’ll walk through a step-by-step process on setting up a retargeting campaign and measuring its success.
How to Set up a Retargeting Conversion Campaign on Facebook
For this example, we’ll pretend we’re setting up a remarketing campaign for HubSpot. To drive qualified leads to a free trial, we’ll set up a mock Facebook retargeting campaign for leads in our database who we know are interested in marketing automation. Here’s how we would set up that campaign.
1) Creating a List
First, you’d would need a list of leads to retarget to. In HubSpot (or your marketing software of choice), you’d compile a list based on two criteria: 1) their lifecycle stage, 2) their interests based on the topic of their most recent download. If this list is sufficiently large, you can move on to the next step. If it’s not, you should revisit your segmentation properties and/or type of retargeting to implement.
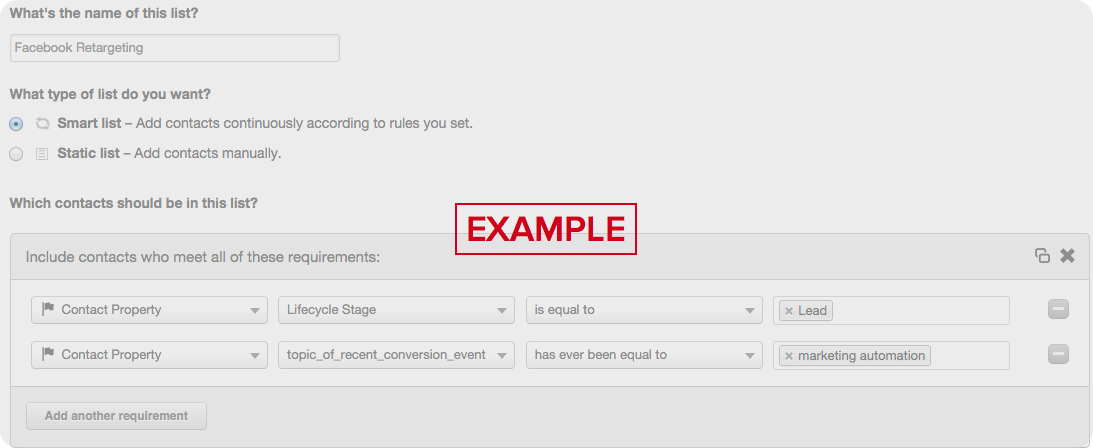
2) Uploading the List to Facebook’s Audience Manager
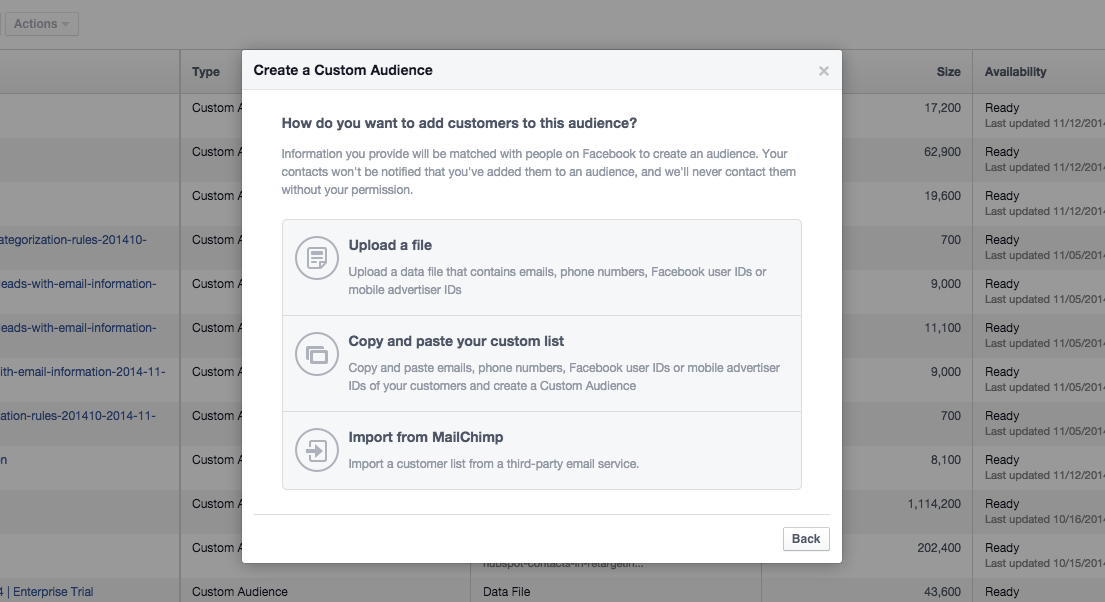
Once our list is processed, we can export the .CSV file and import it directly into Facebook’s Custom Audience manager to match up email addresses with Facebook Profiles. (There are other third party-platforms that also sync these lists on social media and across the web, so feel free to pick which upload/sync option works best for your company.)
Once you hit “Manage Your Ads” on Facebook’s advertising home page, click “Audiences” on the left toolbar. This will allow you to create a customer list by uploading a .CSV or .TXT file and you can sort by user ID’s, phone numbers, or emails (which we recommend). Make sure to give your list an appropriate naming conventions to easily find it later, and leave at least a few hours for it to populate — if you try to create an ad immediately, the audience may not be fully loaded yet.
3) Determining Your Destination URL
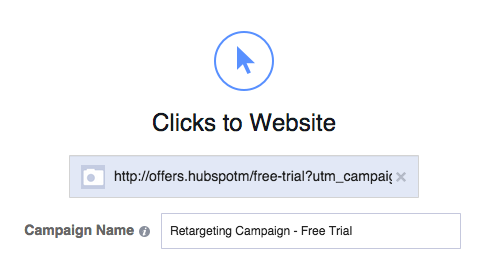
To create a new campaign on Facebook, hit the green “Create Ad” button in the top right of the ad platform home screen. This will prompt you to choose an objective for your campaign, such as sending people to your website, promoting conversions on your pages etc. Whatever option you select (we recommend one of the first two to get people to click through) it is important to include a UTM tracking code — a little snippet of text added to the end of your URL — to help you track success and attribute clicks and conversions from your campaigns. For example, we would create a campaign called “Retargeting” and our URL for the free trial would look like:
http://offers.hubspotm/free-trial?utm_campaign=retargeting&utm_medium=social&utm_source=facebook
Once you enter your URL to promote, the next step is to rename your campaign directly underneath the URL textbox. Try to keep similar naming conventions for your campaigns — this will make it easier to track if you have multiple running at the same time.
4) Segmenting Your Ads
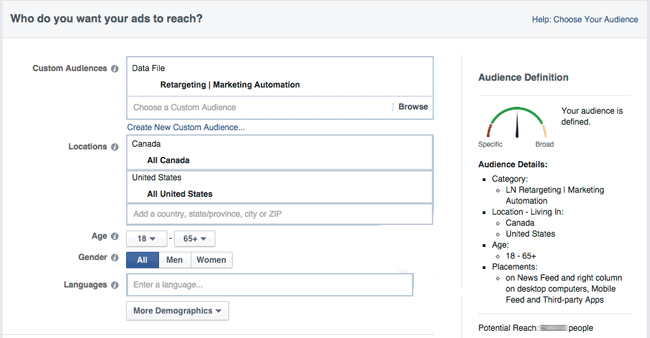
At this point, you can select your custom audience that you uploaded earlier and set the geographic location you want to target. The location is an “AND” setting, meaning if your list contains leads from all over the world and you only select “United States,” some people won’t be served your ads. Depending on your buyer personas, you can also segment by interest, behaviors, age, and other demographic settings which can help you get even more targeted. For conversion campaigns, you’re retargeting to a specific list of contacts already interested in your product, so including other Facebook categories might not make sense.
5) Setting Your Budget
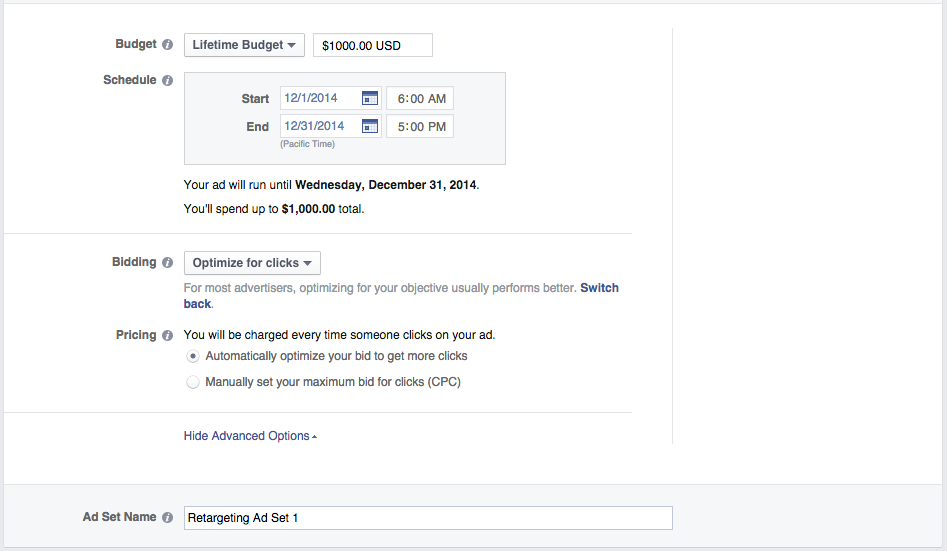
Before even starting the campaign, you should have a set budget for paid tactics, broken out by channel. For Facebook campaigns, you should set a lifetime budget for the length of the campaign, then monitor and adjust accordingly. Most beginners should leave the bidding to “Optimize for Website Click.” You can also name your ad set at this stage, which is helpful if you’d like to differentiate lists, creative, budget, etc. for different ad sets in the same campaign (i.e. leading to the same page).
6) Creating Your Ad
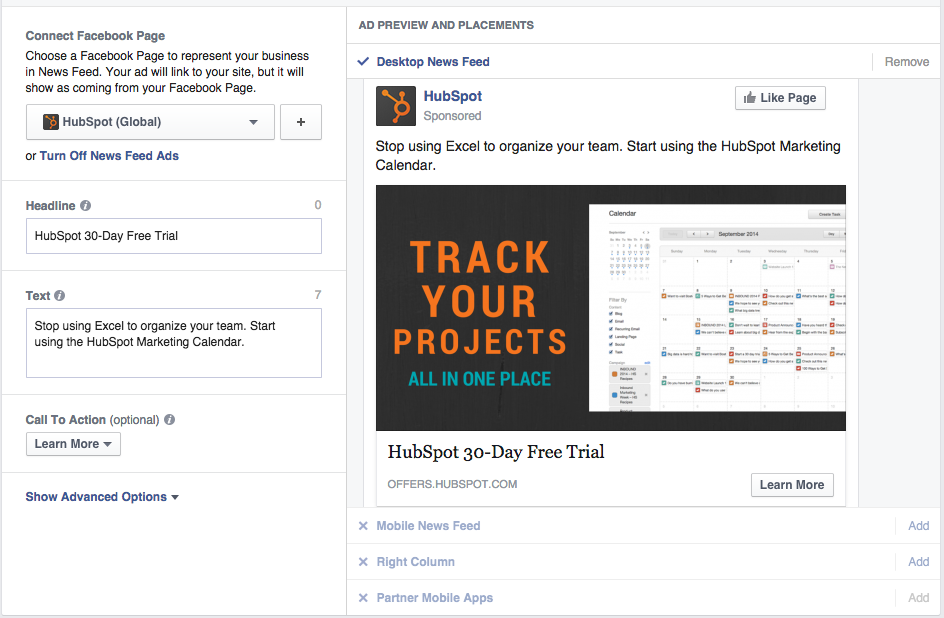
Each ad can have up to six images associated with it, so you can test which ones perform the best and get the most people to click and convert. It’s critical to be clear and concise with your positioning as the headline underneath the image can only be 25 characters long and the text above the image is capped at 90 characters. You can also include call-to-action buttons such as Shop Now, Learn more, Download, etc. on the bottom right of the ad.
Some important details on Facebook ads:
-
Image size is 1200 x 628 pixels
-
Images can only contain 20% text.
-
Static images are rejected if they feature a “play button” that will confuse it for a video.
-
Under “Advanced Options” you can write a News Feed link description up to 200 characters to better explain your ad.
-
By default, ads are shown on mobile newsfeeds, on the right column on desktops, and in partner mobile apps. Depending on where you’d like your customers to see these campaigns, you may want to turn one or all of those options off to only display in the desktop News Feed.
Once you have everything set up, go ahead and click the green “Place Order” button in the bottom right of the screen.
7) Tracking Your Progress
Congratulations, you’ve now created a conversion-based retargeting ad on Facebook! Now you can track website clicks, reach, CTR, CPC, and total spend to match them up to your initial goals.
You can get a glance of how your Facebook retargeting campaigns are doing by going to your Facebook Advertising home page. If you want to dive further into the ad’s metrics, you can go into the ad set where you’ll see information like clicks and spending per day. It is also easy to make edits to your ad from this screen, such as extending the budget, schedule, and creative assets.
If you’re using HubSpot, you can look at the performance of your destination URL to track views, clicks, and submissions back to specific retargeting campaigns.
Retargeting is a great way to keep your prospects engaged and interact with people who have already shown interest in your company. While it may sound like a simple enough concept, there are many aspects of a retargeting campaign that must be worked out before you make the ad copy and creative. Be sure to give enough time to make your lists, set goals and types of campaigns, determine the platforms your ads will run on, and tie the whole conversion path together.

About The Author: MediaMath
More posts by MediaMath